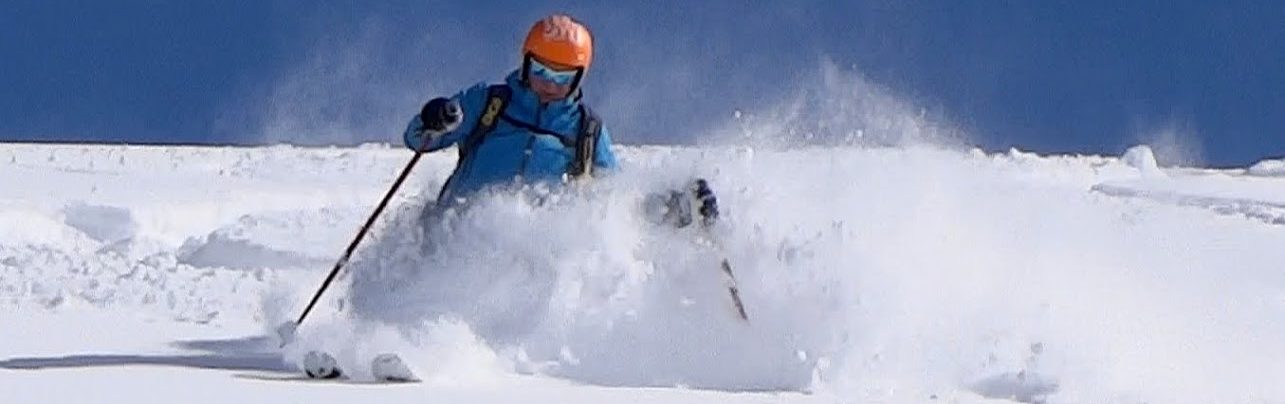

Beth: Good sense of dynamics (disequilibrium) from previous skating experience – your body recognises the associated feelings. Good, functional dynamics enables full parallel skiing as can be seen in the video clip. Remember to push the outside foot forward on steep terrain and to begin the action from the uphill edge of the uphill ski. Practice side slipping.
Charlotte: Simply be patient – perhaps use the braking plough a bit more and wider at times. Skating is a bit alien for you at the moment. Even in the braking plough try to be more on the balls of the feet – the tendency at the moment is to be on the backs of the skis and twisting the body in desperation when the skis don’t deflect you into a turn. The linked “hockey stop” descent was easily your most successful at this stage! Persist and stay on manageable runs.
Dynamics 4 (Advanced Angulation)
Creating “angulation” is exactly like dropping one cheek of your bottom onto a chair placed at the side of your body. This gives the impression of “facing downhill” in shorter turns – which is actually an effect not a cause or intention. The action is centred on a relaxation of the hip joint (outside leg) and a falling into the turn particularly in the second half of the turn . The turn initiation (short to medium radius) is with the skier’s pelvis (not necessarily the chest) facing downhill – thrusting the upper body directly downhill while the skis travel across the hill.
Skating on the Flat
Some people simply have no experience of skating so they need to be taught how to skate. Teaching skating is very simple. The skier simply diverges the ski tips very wide bringing the tails almost together. The instructor stands in front – with skis on but held close together and between the diverged tips of the student’s skis. A ski pole is held across the front of his body in two hands. The skier is then asked to grab the pole in the middle and push the instructor backwards. To make this happen the skier has to fall forwards and apply pressure. The inclination forwards pulls the diverged skis both onto their inside edges. Grip is required from the edges and a push from the legs so it helps if the feet are both rolled onto their inside edges (and adductor muscles engaged in both legs) to prevent the skis from flattening and skidding outwards.
The key focus here is to ensure that the ski grips and the centre of mass is displaced. Once the instructor starts to move backwards the skier will accelerate due to the continued pressure, forward inclination and continued pushing with the legs. The sliding forwards will feel safe due to the support in front and so the sensations of skating/sliding and propulsion will be experienced.
The final stage is for the skier to just hold onto the pole but without the instructor there – imagining that the instructor is there and going through all the same motions – pushing the imaginary instructor ahead. This time there is a natural acceleration and skating as a result.
The sensation of both feet being held on their inside edges and of pushing the centre of mass with the legs are fundamental to skiing – or more the “falling forward” of the centre of mass.
Sideslipping (Joystick control)
The main practical purpose of sideslipping is to get down the mountain without picking up speed. Many learners are deprived of this skill because it is generally undervalued and has become even more neglected due to the complete domination of carving skis. Wider skis are easier for sideslipping in a greater range of conditions. Parabolic skis have some trouble gripping on ice during a sideslip, but modern “double rocker” off-piste skis give a smooth and grippy sideslip in just about every condition, including ice.
The skis are kept on edge by the lateral stiffness of the ski boot shafts. Skis over 100mm wide underfoot begin to create problems on hard snow due to the extra leverage from the edge through the shaft of the boot. Those skis can be very unpleasant on-piste and it’s one limit of how an “all round” ski can be defined. Anything wider than 100mm is not “all round”.
In ski teaching the sideslip serves specifically for developing fall-line skiing. Fall-line skiing is where the skier’s body travels directly downhill and not so much across the hill. This would apply to bumps, steep off-piste such as couloirs and deep powder snow. Slalom is not “fall-line” skiing. (The mechanism of initiating the turn with a sideslip is called “pivoting”.) The skier should be able to sideslip on either ski or both at the same time. It’s normal to start off with both skis on the snow, skis parallel and with the majority of weight on the lower ski just to get a feel for it. The stance is normally quite narrow to prevent the uphill ski from catching the lower edge. Most beginners have trouble keeping the skis close together if they have previously learned to snowplough.
It should be noticed that only the uphill edges of the skis are in contact with the snow so the downhill edges are in the air.
Pulling the legs together with the adductor muscles on both legs ensures the best options for control. Pulling both legs inwards keeps a narrow stance and when the skier practices sideslipping on one leg it ensures the that centre of mass can easily be placed above the appropriate hip joint. Sideslipping is facilitated by subtle movements of the centre of mass – moving it downhill to slide and slightly back uphill to stop. There’s no need to use the feet or knees to try to sideslip – just moving the centre of mass in a manner resembling a joystick rapidly leads to developing awareness of how subtle movement of the centre of mass has pronounced effects.
Sideslipping can be practiced on the uphill ski only, with the adductor muscle pulling in the downhill direction and the pressure still kept on the uphill edge of the ski and hence on the outside edge of the foot. You don’t try to stand on the outside edge of the foot the pressure there is an effect of the ski boot construction / lateral stiffness of the boot cuff running up the lower leg.
If the fronts of the skis are pushed downhill (Joystick Control – by moving the Centre of Mass forward slightly) then with there being no contact of the downhill edges the skier goes into a controlled forward diagonal sideslip on the uphill (braking) edges only. Likewise if the tails are pushed downwards during the sideslip then it turns into a backwards diagonal sideslip. Being able to alternate between straight down the fall-line and the two diagonals is a precursor to the skill necessary for pivoting in the fall-line.
Feet Forward Technique
“Feet Forward Technique”… gives security through the start of a turn on steep terrain by tightening the turn radius.
Pushing the outside (uphill initially) foot forward during the turn. The foot never gets in front of the other foot – it just tightens the turn instead.
The exercise is practised with skis off and standing in ski boots. For this static exercise we use ski pole support with the body faced downhill with the uphill foot pointing across the hill and the downhill foot pointing downhill and the heel jammed into the snow. The uphill boot is pulled over onto its inside edge and pushed forwards in a natural arc.
Here is some video of exactly the same action in ice hockey training. In skiing the direction of travel would be straight downhill instead of straight ahead on the flat ice.
Pivot
After learning skating turns on the flat this is the way beginners should learn to turn for dealing with gradients. They should be assisted if required – by holding a ski pole at the side of the instructor and being physically led through all the moves – just like someone being led in a dance. Eventually the skill is assimilated due to the body being fed the correct feeling repeatedly. Some athletic beginners can cope with this manoeuvre on their own.
The reason for this pivot is to develop fall-line skiing skills. It’s a “braking” form of turn which gives great control over speed – because of the skis only being used on uphill edges. The other important element of this pivot is that both feet are kept downhill of the skier (vertically below the skier) which is not only a fun and playful way to ski but is critical for safety on dangerous steeps such as in couloirs. Most people are totally brainwashed in the skiing world into believing that a ski only turns because of its inside edge with its sidecut. Well it does, but not all of the time. The ski can also turn while on its outside edge during the first half of a turn. If someone has already worked on sideslipping then they already partly know the mechanism for this.
The skier has to stand on the uphill ski only, lifting the lower ski off the snow. The foot should feel pressure on its outside edge but the adductor muscles of this leg should be pulling in the downhill direction. The ski will remain on its outside edge (due to the lateral support of the ski boot shaft preventing the ski from flattening). The downhill pole should be planted for support and so when the lower ski is lifted the body weight should be partially transferred to the pole. This requires the skier to face downhill and tilt forwards from the hips (angulation). Place the centre of mass downhill as much as possible with the use of support from the ski poles. Try to keep the ski on its uphill edge while the centre of mass moves downhill of it. The use of the pole here is to support and guide the centre of mass – which then pulls the ski tip downhill along with it. (In dynamics, skiing with only forward motion of the ski, the pole is not required because the support for the centre of mass comes from the lifting up power of the ski itself. This is why pole planting is only associated with pivoting – sideways motion – and not with dynamic – forward motion – skiing – where only a pole touch at most is required when entering a turn)
The adductor muscles of the outside leg continue to be engaged to allow the centre of mass to pull the front of the ski downwards in a sideslip into a turn. This trains the correct muscular coordination – pulling inwards towards the turn centre with the adductor muscles (of the “outside” leg).
To check that the adductor muscles are being used the “Pole Stopper” exercise is useful. For this exercise I place a ski pole between the tips of the two skis. The skier lifts a ski a few inches off the snow and then pulls the tip against the pole. If the adductor muscles are being used then as the tip is blocked the tail should swing inwards at the back. If the tail swings outwards then the it’s the muscles on the outside of the leg (abductors) being used to push and twist (torque) rather than the adductors (inside of the leg) being used to pull or tension the leg laterally.
When the pivot starts the skier (centre of mass) has to move downhill slightly from the ski but not too much because the ski must remain on the uphill edge for as long as possible. Moving the body too much downhill would change the ski edges far too quickly – for this effect the ski must be allowed to sideslip right from the beginning. The ski will change edges when it is in the fall-line, onto the new “inside” uphill edges for the last part of the turn. All the time – from start to end of the turn the skier needs to pull inwards and tension the adductors.
Completing the turn correctly requires the skier to avoid body rotation and to have the body in an anticipated and angulated stance, ready for another pole plant at the start of the next turn.
Turning on the inside ski is much harder to do – and for easier coordination it’s best to use the preferred foot – eg. right foot for somebody who is right handed.
Pressure is initially felt on the inside edge of the foot with the adductors held tight (pulling uphill) and the ski is initially on its inside edge (uphill). Strong pole support is necessary to get the centre of mass downhill of the ski and a lot of commitment to using the pole is required. It’s much more difficult to get the centre of mass far enough downhill for a smooth pivot when standing on the lower leg. Whereas the outside ski pivot is a great way to start developing good angulation – the inside ski helps to develop more advanced angulation – by exaggerating the “end of turn” angulation requirements. People generally have the greatest trouble with angulation through the second half of a turn – learning to link pivots is the ideal way to develop Angulation and Anticipation skills.
Linking Pivots
Linking the pivots is a true test of edge control and skillful directing of the centre of mass.
Two Skis (Close Stance)
Competition bumps skiers have their feet close together and many people swear by a “two footed” platform off-piste. This works because both skis pivot always on their uphill edge. The feet are always kept downhill of the body and so are the knees. Using the adductor muscles of both legs pulls the skis together and strengthens the stance. It’s important however to always orient the body on only one hip – preferably the outside one. The hip is the biggest joint in the body and it is very close to the centre of mass. Any confusion around this area leads to confusion everywhere. Motion starts from the centre of mass – so use your outside hip in the turn – pulling it backwards during the turn – to get your reflexes working and your core muscles protecting your back the most efficiently possible.
Combining Dynamics and Pivot
- Dynamics depends of forward motion of the skis and lateral falling/pushing of the centre of mass
- Pivot depends on lateral motion of the skis – but always with the centre of mass being driven inward (toward the turn centre) modulated by the support of a pole plant
- The two can be combined – when there is both forward and lateral motion – making overall control of trajectory and speed totally under control of the skier
- In all cases there must be active adductor muscle use – and the feet must be “everted” i.e. turned outward inside the ski boots – diverging sightly (skating stance)
- The essential element to take from combining pivot and dynamics is to execute the turn transition from the uphill edge of the uphill ski – noting that the ski enters the new turn more easily than when on its inside edge and this also prevents stemming (and body rotation)
- Additionally with the transition between the two turns being made from the uphill edge it’s easy to switch into a very tight pivot when desired
Look at the skis in the two images below. The top image is with skis carving – the bottom image skis pivoting

Dynamics 3 (Basic – Using Gravity)
Padding the inside ski up and down during the turn to encourage independent leg action and “falling” to the inside of the turn. The skier during the use of dynamics (with clear forward travel across the slope) generally has to be perpendicular to the slope (including momentarily when travelling across the piste and preparing to transition from one turn to the next). Standing on one leg helps to get naturally into this relationship and avoid being vertical and in the back of the ski boots. Lifting the inside leg also prevents it from blocking motion of the centre of mass into the turn.
Refining removing weight from the inside ski you simply actively bend that knee and hip joint to make the leg very light on the snow.
Short Swings / Jump Turns / Swing Weight
If a jump is made while solidly planting the ski pole then there is zero resistance on the skis so they can literally pivot in mid air – swinging the ski fronts into a turn. Coordination for this is tricky initially and usually work has to be done even on jumping correctly. Most people retract their heels when jumping but they should fully extend their leg in mid air to raise the centre of mass and then flex on landing to absorb the impact smoothly. The soft landing helps to generate a smooth pivot. It’s only necessary to swing the skis a few degrees in the air and then land on the uphill edges to continue a smooth pivot. The pressure cycle and dynamics of coming down into the turn from landing also help to drive the pivot once it has been initiated. When turns like this are linked with a rebounding effect and fluent rhythm they are called short swings. Most people at the start are unable to keep their body from rotating or pushing out the heels/ski tails so they are often unable to use their ski poles properly and unable to keep a good rhythm or accurate coordination.
Ankle Flex (Anterior Tibialis Contraction)
One way to increase pressure on the ski fronts is to flex the ankle inside the ski boot – not by squashing the ankle but by lifting the forefoot toward the shin and creating shin pressure on the cuffs of the ski boots. The boots then act as a lever transmitting force to the ski fronts. Gripping on ice requires pressure on the ski fronts and is strongly aided by the (upward) flexed ankle. Turning power comes mainly from the ski fronts – pressure on the tails of a ski makes it travel straight ahead.
Contracting the shin muscle protects the knee joints.
Keeping the ankle flexed (upwards) protects the knee and helps keep pressure on the front of the ski boot – even while extending the leg.
Extending the (flexed) uphill leg in a turn transition/initiation also serves to protect the knee joint from excessive strain through the quadriceps as the turn progresses.