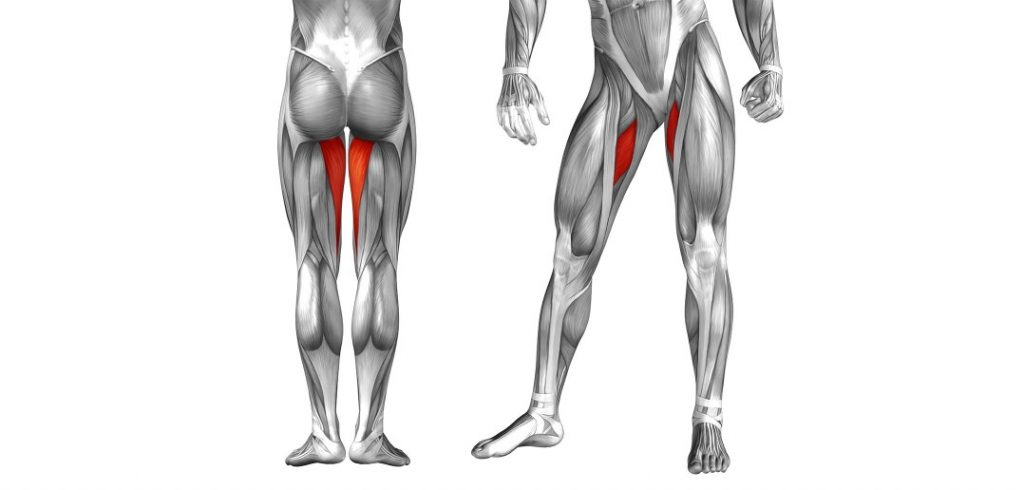
Adductor muscle awareness
Flexion and extension timing/pole use
Advanced Body Management (Hip angulation – activating protective postural muscles )
- Pivoting on one ski only (both directions)
- Short Swings
- Carving introduction
Reminder of which muscles are the adductor muscles.
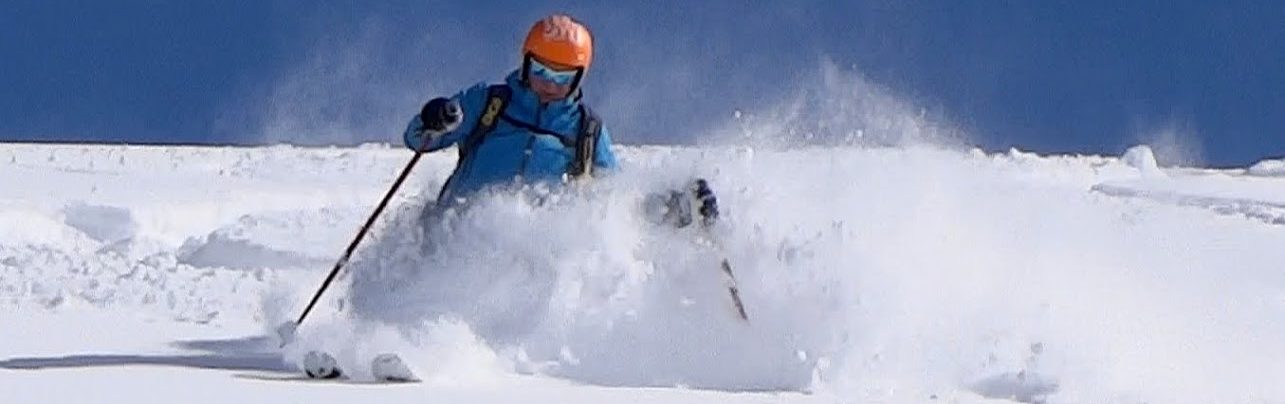
The “One Ski Pivot” is the perfect exercise for feeling the need to use the adductor muscles practically all the time. When using only one leg there is no option – stop engaging the adductor muscle and it’s simply impossible.
Short Swings are where you need to bend the knees and plant your ski pole firmly – it’s the extreme opposite of carving or skating with dynamics. The skis are relying on lateral motion and the pole is to restrain and take control over the dynamics. The adductor muscles are usually engaged to hold the skis together making a single platform out of the two skis.
Short Swings / Jump Turns / Swing Weight
If a jump is made while solidly planting the ski pole then there is zero resistance on the skis so they can literally pivot in mid air – swinging the ski fronts into a turn. Coordination for this is tricky initially and usually work has to be done even on jumping correctly. Most people retract their heels when jumping but they should fully extend their leg in mid air to raise the centre of mass and then flex on landing to absorb the impact smoothly. The soft landing helps to generate a smooth pivot. It’s only necessary to swing the skis a few degrees in the air and then land on the uphill edges to continue a smooth pivot. The pressure cycle and dynamics of coming down into the turn from landing also help to drive the pivot once it has been initiated. When turns like this are linked with a rebounding effect and fluent rhythm they are called short swings. Most people at the start are unable to keep their body from rotating or pushing out the heels/ski tails so they are often unable to use their ski poles properly and unable to keep a good rhythm or accurate coordination.
Introduction to Carving
- while standing still reach one leg out to the side with the ski on edge and then pull it inwards scraping the ground
- now do the same while sliding forward and maintaining some pressure on the extended ski (on gentle and wide terrain)
- the ski will carve an arc with no skidding
- as speed increases the other leg – acting as a stabiliser – can be gradually drawn closer to the extended leg by actively using the adductor muscles
- the main principal exploited here is the direct tension of “pulling” – relating to the analogy of spinning a ball on a string above your head – the only force on the ball is the string pulling inward. Here our centre of mass becomes the anchor pulling the “string”. However – with a bit more speed the “centripetal” force towards the centre comes entirely from the carving ski pushing you inwards.
- the upper body is held over the inside ski – with the belly button centred over the ski and facing the ski tip. Looking down you should see the inside ski midway between your arms.
(Advanced Body Management)
The hips can only be properly relaxed when the shoulders/upper torso are turned into the new turn.
When this is done the entire posture can fall into place automatically.
Beginning from the feet upwards…
- Toes lifted upwards slightly (not “gripping” with the toes)
- Feet slightly everted ( turned outwards) inside the ski boots
- Pressure mostly on either outside edge of each foot and/or balls of the feet (no matter what ski edge is in contact with the snow) It’s the shafts of the boots that hold the skis on their edges – not the feet!
- Outside leg fully extended through the turn
- Inside leg flexed
- Leg adductors pulling together (under tension – knees not allowed to collapse inwards)
- Pelvis tilted to “neutral”
- Soft and flexed at the hip joints
- Outside hip joint pulling backwards (counter rotating the pelvis to the direction of turning)
- Feeling the core at the centre of the physical action (as well as being the centre of mass)
- Upper torso turning in the direction of the turn – even leading with the the uphill arm (punching) across the skis during the turn transition. (not the arm that would make a downhill pole plant!)
- Coordinate the “punch” with a push/skate from the uphill leg.
Watch Mikaela Shiffrin carving on a race course. International rules oblige the skis to have no tighter turning than 30 metres radius. (Very different from recreational skis mostly around 8 to 18 meters radius for carved turns). She is obliged to make a huge pivot (called a “stivot”) to start most of her turns and then drop her centre of mass into the turn to generate as much carved speed as possible. She also uses a leg retraction to get her body across the skis from one turn to the next.
Leg Retraction – Carving
“Leg retraction” – the extended downhill leg at the end of a turn is retracted to allow the body to cross over the skis into the next turn the fastest way possible – then the new outside leg extends (independent leg action). The video below shows a top World Cup racer using this movement pattern. It’s easier to learn this pattern first and apply it to “normal” skiing before learning how to retract both legs simultaneously with the feet together to absorb bumps.
