Video
Before Instruction
Scene 1: Explaining how to turn – (Classic ski instruction – centre of mass moving according to statics and then twisting and forcing compensations added)
Scene 2: Skiing with Centre of Mass moving to the outside of the turn, facing downhill with the shoulders and pushing the tails of the skis out.
After Instruction
Scene 3: Basic Dynamics in place – following the skis
Scene 4: Angulation added
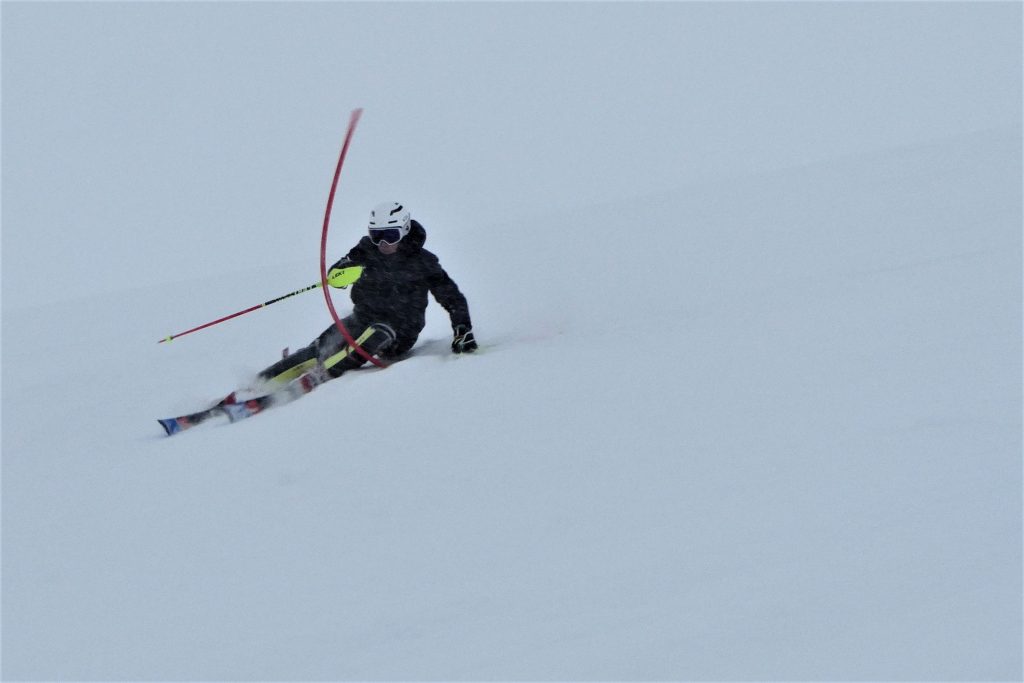
Scene 5: First attempts at Pivot
Only missing video is the final putting together of elements of pivot and dynamics – initiating the dynamics from the uphill edge of the uphill ski – giving a narrow stance and solid platform.
Free Dynamics (Motion of the Centre of Mass into the turn and out of the turn)
http://madeinmountains.com/dynamics/
The above link gives the essential information regarding dynamics – covering the basic pedagogy used on the mountain also. Callum had no problem understanding and applying dynamics both into and out of the turns – completely eliminating the entire bunch of problems and inappropriate movements and actions created by his ski school “legacy” technique based on statics instead of dynamics.
Developing dynamics further leads to an enormous freedom of range of motion – displayed in the inclination seen in the following photograph of another student.
For off piste in difficult snow it’s the “end of turn” dynamics that has to be focused on.
The skier only has one job: To fall Over! The ski only has one job: To lift the skier back up!
There is NO balance! We search Stability from Organised Accelerations.
Angulation (Hip Angulation, Boots, Alignment, Pressure on ski fronts)
http://madeinmountains.com/chiskiing/
The next photo below shows when angulation is added to inclination – for sharper turns and agility.
(Use the link above for basic revision.)
Remember that hip angulation is about controlling the centre of mass by altering body shape from the main joints – the hips. Make sure you have neutral pelvis (sometimes this means pulling it up at the front. Tilt forward from the hip joints. Pull the hip backward (not the shoulder or the foot) on the supporting leg. In turning it’s the support leg that is used but the pulling backward takes place in the second half of the turn to stop the hip being pulled around in front of the rib cage. Always look for the stretch at the lower abdomen instead of a compression – to allow the postural reflex to work. This protects your back. In essence, for short turns, the goal is to have the pelvis facing more or less downhill – but not the chest or shoulders.
Angulation is what permits pressure to be applied to the fronts of the skis in a strong but safe manner.
Callum has to focus on developing angulation as previous legacy technique and crap ski boots have combined to leave him in the backseat most of the time.
Callum’s boots were under-edged but had no cuff adjustment available. In addition they were set at flex 75 DIN which is “wet noodle” level. Get Salomon boots if they fit your feet and nothing under 120 DIN rating. Do your own cuff adjustment with the help of a friend – don’t let the shop do it and sell you a heap of expensive junk services. The stiffness lets pressure be applied – through angulation – to the ski fronts – with stability and the the alignment affects just about everything.
Callum is the first person ever that I’ve come across who uses his feet correctly for skiing naturally – so nothing more needs to be said about that here. The angulation will encourage this to continue but more from the balls of the feet.
Pivot (Braking Skiing, Pole Plant, Bumps)
http://madeinmountains.com/pivo/
There is a large section written (above link) on pivoting so I won’t repeat it here. This is “braking” skiing and dependent on the skis not running forward across the hill – but travelling always downhill from uphill edge to uphill edge – braking.
The entry to the turn is on the outside edge of the uphill ski – the ski side-slipping/ swinging into the turn – controlled by the centre of mass. This is where pole use comes in – the pole being weighted strongly to restrain the centre of mass appropriately. Unlike the free dynamics used in racing, when the ski essentially travels sideways the dynamics require restraint through pole support.
Applying pivoting in bumps we get both ski tips in the air while standing on the front of a bump and plant the pole on the peak of the bump then moving the centre of mass between the ski-tips and the pole we swing the tips into the turn. We then side-slip down the back of the bump and use angulation to prevent rotation.
The common denominator with all dynamics is a “pulling inward” with the centre of mass – never pushing outward. We work to generate “centripetal” (inward) force – (Analogy… string pulling inward as a ball on the end of it is spun around in a circle above the head) – the only force being generated has to be inward – even when being lifted up at the end of a dynamic turn by the ski cutting below the trajectory of the body – giving the illusion that you are being forced out of the turn.
Our session was completed by combining free dynamics and pivoting – by initiating the push/leg extension of the uphill leg to begin a new turn – while still on the uphill edge. This anchors the ski as it cannot be pushed outward and ensures a solid platform for launching free flow dynamics. Either edge of the ski will support entry into a new turn – only the motion of the centre of mass counts.